Linux basics
File System Hierarchy Standard (FHS):
The Filesystem Hierarchy Standard (FHS) is a widely accepted industry standard that defines the structure and organization of directories in a Linux file system. It provides a consistent and predictable layout for Linux distributions, allowing software developers and users to locate files and directories in a standardized manner.
The FHS defines several key directories and their purposes. Here are some of the main directories specified by the FHS:
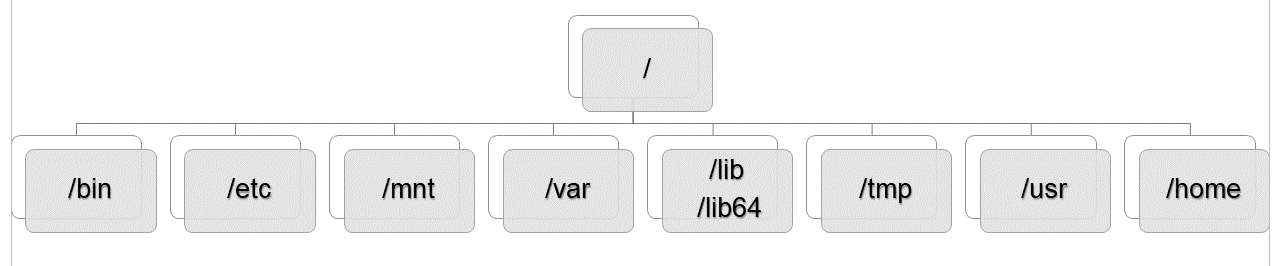
/ (Root Directory):
- The root directory is the top-level directory in the file system hierarchy.
- It contains all other directories and files in the system.
- Typically, only the root user has write access to this directory.
/bin (Essential User Binaries):
- Contains essential executable binaries (programs) required for system boot and maintenance.
- Common utilities and commands like ls, cp, mv, and rm are located here.
- These binaries are accessible by all users and are crucial for basic system functionality.
/etc (System Configuration Files):
- Contains system-wide configuration files and directories.
- Configuration files for various services, network settings, user management, etc., are stored here.
- Administrators can modify these files to customize system behavior.
/home (User Home Directories):
- Each user on the system typically has a directory under /home for personal files and settings.
- Users have write access to their respective home directories.
- This directory is often used for storing user-specific data and personal settings.
/lib and /lib64 (Shared Libraries):
- Contain shared libraries required by executable binaries in /bin and /sbin.
- /lib is for 32-bit libraries, while /lib64 is for 64-bit libraries.
- Shared libraries are files that contain code used by multiple applications, enabling code reuse and reducing disk space usage.
/mnt (Mount Points):
- Used as a mount point for temporarily mounting external storage devices or file systems.
- For example, mounting a USB drive or network file system may utilize this directory.
/tmp (Temporary Files):
- Used for storing temporary files created by applications and users.
- The contents of this directory are typically cleared on system reboot.
- It is accessible to all users and should not be used for long-term storage.
/usr (User Programs):
- Contains user-related programs, libraries, documentation, and resources.
- Subdirectories include /usr/bin for user binaries, /usr/lib for libraries, and /usr/share for shared data.
/var (Variable Data):
- Stores variable data, including log files, spool files, temporary files, and databases.
- Subdirectories like /var/log and /var/spool contain specific types of data.
These are just some of the key directories defined by the FHS. The FHS provides guidelines for maintaining consistency in the Linux file system layout across different distributions. Adhering to this standard ensures that software and system administrators can reliably locate and access files and directories in a Linux system.
File System Navigation:
- Navigating the file system using the command-line interface (CLI).
- Understanding the concept of the current working directory.
- Using the 'cd' command to change directories.
- Using relative and absolute paths to specify file or directory locations.
- Understanding the special directories '.', '..', and '~'.
File system navigation in Linux refers to the process of moving through the directory structure to locate and access files and directories using the command-line interface (CLI). It involves using commands and techniques to change directories, list directory contents, and navigate between directories.
Here are the key aspects of file system navigation in Linux:
Current Working Directory:
- When you open a terminal or command prompt, you start in a specific directory known as the current working directory.
- The current working directory represents your current location in the file system.
- By default, when you execute commands or specify file paths, they are relative to the current working directory.
Changing Directories (cd command):
- The
cd(change directory) command is used to navigate between directories. - To move to a specific directory, use
cdfollowed by the path to the desired directory. - Examples:
cd /home/user(move to the /home/user directory),cd ..(move to the parent directory),cd ~(move to the user's home directory).
Relative and Absolute Paths:
- Paths in Linux can be specified as relative or absolute.
- A relative path is specified relative to the current working directory.
- An absolute path specifies the full path from the root directory.
- Examples:
cd Documents(relative path),cd /home/user/Documents(absolute path).
Listing Directory Contents (ls command):
- The
lscommand is used to list the contents of a directory. - By default, it displays the names of files and directories in the current directory.
- Options like
-lprovide detailed information, including permissions, ownership, size, and timestamps. - Examples:
ls(list current directory contents),ls -l(detailed listing),ls /home/user(list contents of a specific directory).
Navigating Up and Down the Directory Hierarchy:
- To navigate up one level in the directory hierarchy, use
cd ... - To navigate down into a subdirectory, use
cdfollowed by the subdirectory name. - Examples: If the current directory is /home/user,
cd ..moves to /home,cd Documentsmoves to /home/user/Documents.
Special Directories and Symbols:
- The
.(dot) represents the current directory. - The
..(dot dot) represents the parent directory. - The
~(tilde) represents the user's home directory. - Examples:
ls .(list current directory contents),cd ..(move to the parent directory),cd ~(move to the home directory).
Tab Completion:
- Linux shells often support tab completion, which can make navigation easier.
- Start typing a directory or file name, then press Tab to automatically complete the name.
- If multiple options match, pressing Tab twice displays a list of possible completions.
Understanding file system navigation is crucial for effectively working with the Linux command line and performing various tasks, such as accessing files, executing commands, and managing directories. By mastering file system navigation, you can efficiently locate and work with files and directories in your Linux environment.
Listing and Viewing Files:
- Using the 'ls' command to list files and directories.
- Understanding different options like '-l' for detailed listing and '-a' to show hidden files.
- Displaying file and directory permissions, ownership, size, and timestamps.
- Using commands like 'cat', 'less', or 'more' to view file contents.
Listing and viewing files in Linux is a fundamental task that involves displaying the contents and details of files in the command-line interface (CLI). It helps users understand the file structure, permissions, ownership, and other attributes. Here's an explanation of how to list and view files in Linux:
Listing Files (ls command):
- The
lscommand is used to list the files and directories in a given location. - By default, it displays the names of files and directories in the current directory.
- Example:
ls(list current directory contents)
Common options with the ls command include:
- -l: Provides a detailed listing, including permissions, ownership, size, and timestamps.
- -a: Shows all files, including hidden files that start with a dot (e.g., .bashrc).
- -h: Displays file sizes in human-readable format (e.g., 1K, 2M, 3G).
- -t: Sorts files by modification time (newest first).
- -r: Reverses the order of the listing.
Example: ls -lha (detailed listing of all files, including hidden files)
Viewing File Contents (cat, less, more commands):
- Linux provides several commands to view the contents of a file.
- The
catcommand is used to display the entire contents of a file on the terminal. - Example:
cat filename.txt(display the contents of the file)
However, for large files or long outputs, it's often more convenient to use the following commands:
-
The
lesscommand allows scrolling through a file and searching for specific content.- Press the Spacebar to scroll down one page.
- Use the arrow keys or the j and k keys to navigate line by line.
- Press / to search for a specific pattern.
- Press q to exit the viewer.
- Example:
less filename.txt(view the file using the less command)
-
The
morecommand is similar to less but only allows scrolling forward in the file.- Press the Spacebar to scroll down one page.
- Press Enter to scroll down one line.
- Press q to exit the viewer.
- Example:
more filename.txt(view the file using the more command)
Paging Output (piping and redirection):
- When a command generates a large output, it can be piped or redirected to a paging program.
- The
|symbol (pipe) is used to pass the output of one command as input to another. -
Example:
ls -lha | less(list files in the current directory with detailed output, then display them using the less command) -
Redirection operators can be used to save command output to a file.
- The
>operator redirects output to a file, overwriting its contents if the file already exists. - The
>>operator appends output to a file, preserving its existing contents. - Examples:
ls -lha > filelist.txt(save the output of the ls command to a file)ls -lha >> filelist.txt(append the output of the ls command to an existing file)
These file listing and viewing techniques are essential for navigating and understanding the contents of a Linux file system. By mastering these commands, you can efficiently explore files, view their content, and perform various file-related operations using the Linux command-line interface.
Creating and Managing Directories:
- Creating directories with the 'mkdir' command.
- Specifying parent directories when creating nested directories.
- Renaming and moving directories using the 'mv' command.
- Removing directories with the 'rmdir' or 'rm' command.
Creating and managing directories in Linux is an essential skill that allows users to organize files and directories effectively. Here's an explanation of what needs to be covered when learning about creating and managing directories in Linux:
Creating Directories (mkdir command):
- The
mkdircommand is used to create directories. - To create a new directory, use
mkdirfollowed by the name of the directory. - Example:
mkdir directory_name(create a new directory with the specified name)
Common options with the mkdir command include:
- -p: Creates parent directories if they do not exist. For example, mkdir -p parent/child creates both the parent and child directories.
Specifying Parent Directories:
- When creating nested directories, you can specify the full path to the desired location.
- Example:
mkdir parent/child/grandchild(create a nested directory structure)
Renaming and Moving Directories (mv command):
- The
mvcommand can be used to rename or move directories. - To rename a directory, use
mvfollowed by the current directory name and the new name. - Example:
mv old_name new_name(rename a directory from old_name to new_name) - To move a directory to a different location, use
mvfollowed by the directory name and the destination path. - Example:
mv directory_name destination_path(move the directory to the specified destination)
Removing Directories (rmdir and rm commands):
- The
rmdircommand is used to remove empty directories. - To remove a directory, use
rmdirfollowed by the directory name. -
Example:
rmdir directory_name(remove an empty directory) -
The
rmcommand with the-roption is used to remove directories and their contents recursively. - Caution: Be careful when using
rm -ras it permanently deletes files and directories without confirmation. - Example:
rm -r directory_name(remove a directory and its contents recursively)
Handling Directory Permissions:
- Directories, like files, have permissions that control read, write, and execute access.
- The
chmodcommand is used to modify directory permissions. - Example:
chmod permissions directory_name(change the permissions of a directory)
Working with Multiple Directories:
- When dealing with multiple directories, it is helpful to understand concepts such as the current working directory and relative paths.
- The current working directory represents your current location in the file system.
- Relative paths specify the location of a directory or file relative to the current working directory.
- Examples:
cd directory_name(change to the specified directory),cd ..(move to the parent directory)
Understanding how to create, manage, rename, move, and remove directories is crucial for effective file organization and management in Linux. These skills allow users to structure their file system, group related files together, and perform various directory operations efficiently using the Linux command-line interface.
Working with Files:
- Creating files using the 'touch' command.
- Copying files with the 'cp' command.
- Renaming and moving files with the 'mv' command.
- Removing files with the 'rm' command.
- Understanding file permissions and ownership.
Working with files on Linux involves performing various operations such as creating, copying, moving, renaming, editing, and deleting files. Here's an explanation of what needs to be covered when learning about working with files on Linux:
Creating Files:
- Files can be created using different methods, such as text editors or command-line tools.
- Text editors like
vi,nano, orgeditallow you to create and edit files interactively. - Command-line tools like
touchcan be used to create empty files. - Example:
touch filename.txt(create an empty file with the specified name)
Copying Files (cp command):
- The
cpcommand is used to copy files from one location to another. - To copy a file, use
cpfollowed by the source file and the destination. - Example:
cp source_file destination(copy a file to the specified destination) - The
cpcommand also supports additional options, such as-rfor recursively copying directories and their contents. - Example:
cp -r source_directory destination(recursively copy a directory and its contents)
Moving and Renaming Files (mv command):
- The
mvcommand is used to move or rename files and directories. - To move a file, use
mvfollowed by the source file and the destination. - Example:
mv source_file destination(move a file to the specified destination) - To rename a file, use
mvfollowed by the current file name and the new name. - Example:
mv old_name new_name(rename a file from old_name to new_name)
Viewing and Editing Files:
- File contents can be viewed using various commands, such as
cat,less, ormore. - Example:
cat filename.txt(display the contents of a file on the terminal) - Text editors like
vi,nano, orgeditallow you to view and edit file contents interactively. - Example:
nano filename.txt(open a file for editing using the nano text editor)
Deleting Files (rm command):
- The
rmcommand is used to delete files and directories. - To delete a file, use
rmfollowed by the file name. - Example:
rm filename.txt(delete the specified file) - The
rmcommand with the-roption is used to delete directories and their contents recursively. - Caution: Be careful when using
rm -ras it permanently deletes files and directories without confirmation. - Example:
rm -r directory_name(delete a directory and its contents recursively)
File Permissions:
- Files, like directories, have permissions that control read, write, and execute access.
- The
chmodcommand is used to modify file permissions. - Example:
chmod permissions filename.txt(change the permissions of a file)
Understanding how to create, copy, move, rename, view, edit, and delete files is essential for effectively managing files and directories in Linux. These skills enable users to handle their data, perform file operations efficiently, and maintain proper file organization using the Linux command-line interface.
File Permissions and Ownership:
- Understanding the concept of file permissions (read, write, execute) for owners, groups, and others.
- Modifying file permissions using the 'chmod' command.
- Changing file ownership and group ownership using the 'chown' and 'chgrp' commands.
- Viewing and interpreting file permissions using the 'ls' command.
Understanding file permissions and ownership is crucial for managing security and access control in Linux. Here's an explanation of what needs to be covered when learning about file permissions and ownership on Linux:
File Permissions:
- File permissions determine who can read, write, and execute a file.
- Permissions are represented by three sets of characters: user, group, and others.
- The three types of permissions are:
- Read (
r): Allows reading/viewing the file's contents. - Write (
w): Allows modifying the file or creating/deleting files in a directory. - Execute (
x): Allows executing the file as a program or traversing a directory.
- Read (
- Permissions are denoted using a combination of these characters, such as
rwxfor full permissions or-to indicate no permission.
Permission Types:
- There are three types of entities associated with file permissions:
- User (u): The owner of the file.
- Group (g): A group of users to which the file belongs.
- Others (o): All other users on the system.
Viewing File Permissions (ls -l command):
- The
ls -lcommand displays detailed information about files, including permissions. - The leftmost column in the output represents the file permissions.
- Example:
ls -l filename.txt(display detailed information about the file, including permissions)
Changing File Permissions (chmod command):
- The
chmodcommand is used to modify file permissions. - Permissions can be modified using either symbolic or numeric representation.
- Symbolic representation uses symbols (+, -, =) to add, remove, or set permissions.
- Examples:
chmod u+r filename.txt(add read permission for the owner)chmod g-w filename.txt(remove write permission for the group)chmod o=x filename.txt(set execute permission for others)
- Numeric representation uses octal numbers (0-7) to specify permissions.
- Each permission type (read, write, execute) is assigned a numeric value:
- Read (r): 4
- Write (w): 2
- Execute (x): 1
- Examples:
chmod 744 filename.txt(owner has read, write, and execute permissions, others have read-only permissions)chmod 640 filename.txt(owner has read and write permissions, group has read-only permissions, others have no permissions)
File Ownership:
- File ownership identifies the user and group associated with a file.
- The user who creates a file becomes the owner, and the file belongs to a specific group.
- The
ls -lcommand also displays the owner and group information. - Example:
ls -l filename.txt(display detailed information about the file, including owner and group)
Changing File Ownership (chown and chgrp commands):
- The
chowncommand is used to change the owner of a file or directory. -
Example:
chown new_owner filename.txt(change the owner of the file to the specified user) -
The
chgrpcommand is used to change the group ownership of a file or directory. - Example:
chgrp new_group filename.txt(change the group ownership of the file to the specified group)
Understanding file permissions and ownership is essential for maintaining proper access control and security in a Linux system. These concepts allow users to control who can access, modify, and execute files, ensuring data confidentiality and integrity. By mastering file permissions and ownership, users can effectively manage file security and permissions in their
File System Operations:
- Copying and moving files across directories or file systems.
- Symbolic links and their usage.
- Archiving and compressing files and directories using tools like 'tar' and 'gzip'.
- Searching for files and directories using commands like 'find' and 'grep'.
File system operations are essential for managing files and directories effectively on Linux. Here's an explanation of what needs to be covered when learning about file system operations on Linux:
Copying Files and Directories (cp command):
- The
cpcommand is used to copy files and directories. - To copy a file, use
cpfollowed by the source file and the destination. - Example:
cp source_file destination(copy a file to the specified destination) - To copy a directory and its contents recursively, use
cpwith the-roption. - Example:
cp -r source_directory destination(copy a directory and its contents to the specified destination)
Moving and Renaming Files and Directories (mv command):
- The
mvcommand is used to move or rename files and directories. - To move a file, use
mvfollowed by the source file and the destination. - Example:
mv source_file destination(move a file to the specified destination) - To rename a file, use
mvfollowed by the current file name and the new name. - Example:
mv old_name new_name(rename a file from old_name to new_name)
Deleting Files and Directories (rm command):
- The
rmcommand is used to delete files and directories. - To delete a file, use
rmfollowed by the file name. - Example:
rm filename.txt(delete the specified file) - To delete a directory and its contents recursively, use
rmwith the-roption. - Caution: Be careful when using
rm -ras it permanently deletes files and directories without confirmation. - Example:
rm -r directory_name(delete a directory and its contents recursively)
Finding Files and Directories (find command):
- The
findcommand is used to search for files and directories based on various criteria. - It allows searching by name, type, size, modification time, and more.
- Example:
find /path/to/search -name filename.txt(find files with the specified name in the specified directory or path)
File Compression and Archiving (tar and gzip commands):
- The
tarcommand is used to create archives (tarballs) that combine multiple files into a single file. - Example:
tar -cvf archive.tar file1 file2 directory(create a tarball containing the specified files and directories) - The
gzipcommand is used to compress files. - Example:
gzip filename.txt(compress the specified file, resulting in filename.txt.gz) - To combine both operations, you can use the tar command with gzip compression:
- Example:
tar -czvf archive.tar.gz file1 file2 directory(create a compressed tarball)
- Example:
Changing File and Directory Permissions (chmod command):
- The
chmodcommand is used to change file and directory permissions. - Permissions can be modified using either symbolic or numeric representation.
- Example:
chmod permissions filename.txt(change the permissions of a file)
File Ownership and Group (chown and chgrp commands):
- The
chowncommand is used to change the owner of a file or directory. - Example:
chown new_owner filename.txt(change the owner of the file to the specified user) - The
chgrpcommand is used to change the group ownership of a file or directory. - Example:
chgrp new_group filename.txt(change the group ownership of the file to the specified group)
Understanding file system operations is crucial for effectively managing files and directories in Linux. These operations allow users to copy, move, rename, delete, search for files, compress and archive files, and modify permissions and ownership. By mastering file system operations, users can efficiently organize and manipulate their data in the Linux environment.
When learning about the command-line interface (CLI) in Linux, it's important to cover the following topics and common commands:
Shell Basics:
- Understand what a shell is and the different types available (e.g., Bash, Zsh).
- Learn how to open a terminal and access the command-line interface.
A shell is a command-line interface (CLI) program that provides a user-friendly way to interact with the operating system. It interprets the commands entered by the user and executes them. The shell acts as an intermediary between the user and the operating system, allowing users to run commands, manage files and directories, and perform various tasks.
There are several different types of shells available in Linux, with Bash (Bourne Again SHell) and Zsh (Z Shell) being two of the most popular ones. Here's a detailed explanation of each:
Bash (Bourne Again SHell):
- Bash is the default shell for most Linux distributions.
- It is a successor to the original Bourne shell (sh) and provides compatibility with sh.
- Bash offers a wide range of features, including command-line editing, command history, tab completion, and scripting capabilities.
- It supports a large number of built-in commands and utilities, making it highly versatile.
- Bash scripts are widely used for automating tasks and writing shell scripts.
- Bash configuration files, such as
~/.bashrcand~/.bash_profile, allow users to customize their shell environment.
Zsh (Z Shell):
- Zsh is an extended version of the Bourne shell with additional features and customization options.
- It provides advanced command-line editing, extensive completion capabilities, and improved scripting capabilities.
- Zsh offers a rich set of themes and plugins that enhance productivity and user experience.
- It supports features like spelling correction, globbing, path expansion, and history sharing among multiple terminal sessions.
- Zsh configuration files, such as
~/.zshrcand~/.zshenv, allow users to configure and customize the shell behavior.
While Bash is the default shell on most Linux systems, users have the flexibility to switch to other shells like Zsh or other alternatives based on their preferences and requirements. Shells provide different sets of features and customization options, allowing users to tailor their command-line experience to their liking.
It's worth noting that both Bash and Zsh are highly capable shells and are widely used by Linux users. Ultimately, the choice between them (or any other shell) comes down to personal preference, familiarity, and the specific features and capabilities required for the tasks at hand.
Navigating the File System:
- Use commands like
ls,cd,pwd, anddirto navigate and explore the file system. - Understand relative and absolute paths.
- Master the use of special characters like
~(home directory),.(current directory), and..(parent directory).
Working with Files and Directories:
- Create and delete files and directories using commands such as
touch,mkdir,rm, andrmdir. - Copy, move, and rename files using commands like
cp,mv, andrename. - View file contents with commands like
cat,less, andhead.
File and Directory Permissions:
- Learn how to view and modify file permissions using commands like
ls -landchmod. - Understand the symbolic and numeric representation of permissions.
- Explore changing ownership with commands like
chownandchgrp.
Text Processing:
- Use commands like
grep,sed, andawkto search, manipulate, and process text files. - Understand regular expressions and pattern matching.
File Compression and Archiving:
- Use commands like
tar,gzip, andzipto compress and archive files and directories. - Learn how to extract and decompress archives.
Process Management:
- Monitor and manage processes with commands like
ps,top,kill, andbg. - Understand background and foreground processes.
- Utilize job control to manage multiple processes simultaneously.
Process management is an essential aspect of working with the command-line interface (CLI) in Linux. It involves monitoring and controlling the execution of processes (running programs) on a system. Here's a detailed explanation of the different aspects of process management:
Monitoring Processes:
-
psCommand: Thepscommand is used to view information about running processes. It provides a snapshot of the currently running processes, displaying details such as process ID (PID), CPU and memory usage, parent process ID (PPID), and more. Commonly used options includeps aux(displays all processes in a user-oriented format) andps -ef(displays all processes in a system-oriented format). -
topCommand: Thetopcommand provides real-time monitoring of processes. It displays a dynamic, interactive table showing information about running processes, sorted by CPU usage by default.topcontinuously updates the information, allowing you to monitor resource usage, process states, and other metrics. It also provides options to sort processes based on different criteria and send signals to processes.
Managing Processes:
-
killCommand: Thekillcommand is used to terminate or send signals to processes. Each process is identified by its unique process ID (PID). By default,killsends the SIGTERM signal, requesting a process to terminate gracefully. If needed, a different signal can be specified, such as SIGKILL (kill -9), which forcefully terminates a process. For example,kill PIDterminates a process with the specified PID. -
Process States: Processes in Linux can be in various states, such as running, sleeping, stopped, or terminated. The
pscommand andtopcommand display the state of each process. Understanding process states helps in troubleshooting and managing processes effectively. -
Background and Foreground Processes: By default, when you run a command in the CLI, it executes as a foreground process, meaning it takes control of the terminal until it completes. However, you can run processes in the background by appending an ampersand (
&) at the end of the command. Background processes do not block the terminal, allowing you to continue using it. Thebgcommand is used to move a stopped or suspended process to the background, and thefgcommand is used to bring a background process to the foreground.
Job Control:
- Job control allows managing multiple processes simultaneously and manipulating their execution. It is especially useful when working with background processes.
Ctrl+C: Pressing Ctrl+C sends the SIGINT signal to the currently running foreground process, causing it to terminate.Ctrl+Z: Pressing Ctrl+Z suspends the currently running foreground process and puts it in a stopped state. The process can be resumed in the background or foreground using thebgorfgcommand.jobsCommand: Thejobscommand displays the status of background and suspended processes, showing their job IDs and states.disownCommand: Thedisowncommand is used to detach a process from the current shell session, preventing it from receiving SIGHUP (hangup) signal when the shell exits.
Understanding process management allows you to monitor system resources, terminate unresponsive processes, and control the execution of commands in the background or foreground. By using commands like ps, top, kill, bg, and fg, you can effectively manage processes and ensure efficient use of system resources.
Package Management:
- Use package managers like
apt,yum, ordnfto install, update, and remove software packages. - Understand package repositories and dependencies.
Package management is a crucial aspect of Linux operating systems, enabling users to conveniently install, update, and remove software packages. Here's a detailed explanation of the topics related to package management:
Package Managers:
- Package managers are software tools that automate the process of managing software packages on a Linux system.
- Different Linux distributions often have their own package managers. Some popular ones include:
apt(Advanced Package Tool): Used by Debian and Ubuntu-based distributions.yum(Yellowdog Updater Modified): Used by CentOS, Fedora, and Red Hat Enterprise Linux.dnf(Dandified Yum): A replacement foryumin newer versions of Fedora and Red Hat Enterprise Linux.
Package Repositories:
- Package repositories are online repositories that host software packages and their metadata.
- Package managers use these repositories to download and install packages.
- Repositories contain a collection of packages maintained by the distribution or third-party providers.
- Users can configure package manager settings to access different repositories based on their needs.
Package Management Commands:
-
Installing Packages: The package manager provides commands to install packages. For example:
apt install package_name: Installs a package usingapt.yum install package_name: Installs a package usingyum.dnf install package_name: Installs a package usingdnf.
-
Updating Packages: Package managers offer commands to update installed packages to their latest versions. For example:
apt update: Updates the package repository metadata usingapt.yum update: Updates installed packages usingyum.dnf update: Updates installed packages usingdnf.
-
Removing Packages: Package managers allow users to remove installed packages. For example:
apt remove package_name: Removes a package usingapt.yum remove package_name: Removes a package usingyum.dnf remove package_name: Removes a package usingdnf.
Package Dependencies:
- Packages often depend on other software libraries and packages to function correctly.
- Package managers handle dependencies by automatically resolving and installing required dependencies.
- When a package is installed, the package manager checks its dependencies and ensures they are met.
- Package managers maintain a database of installed packages and their dependencies for efficient management.
Package Verification and Security:
- Package managers typically verify the authenticity and integrity of packages before installation.
- Package repositories use cryptographic signatures and checksums to verify packages.
- Package managers can also verify package dependencies to ensure compatibility and prevent conflicts.
- Security updates are provided through package repositories, allowing users to keep their systems protected.
Understanding package management and using package managers like apt, yum, or dnf simplifies the installation, update, and removal of software packages on Linux systems. It ensures efficient software management, dependency resolution, and access to security updates, enabling users to keep their systems up to date and secure.
File Transfer:
- Transfer files between local and remote systems using commands like
scpandsftp. - Access remote systems via SSH with the
sshcommand.
File transfer is a common task in Linux when you need to move files between local and remote systems. Two commonly used commands for file transfer are scp (Secure Copy) and sftp (Secure File Transfer Protocol). Additionally, the ssh (Secure Shell) command allows you to access and manage remote systems securely. Here's a detailed explanation of each topic:
scp (Secure Copy):
scpis a command-line utility used for secure file transfer between local and remote systems over SSH.- It provides encryption and authentication to ensure data integrity and confidentiality during file transfer.
- To transfer a file from the local system to a remote system, use the following syntax:
scp local_file remote_user@remote_host:remote_directoryFor example:scp myfile.txt user@remotehost:/home/user/ - To transfer a file from a remote system to the local system, reverse the source and destination in the command:
scp remote_user@remote_host:remote_file local_directoryFor example:scp user@remotehost:/home/user/remote_file /path/to/local_directory/
sftp (Secure File Transfer Protocol):
sftpis an interactive command-line utility for secure file transfer, similar to FTP but over SSH.- It provides a secure and encrypted channel for transferring files between systems.
- To start an
sftpsession, use the following syntax:sftp remote_user@remote_host - Once connected, you can use various commands like
get,put,ls,cd, andrmto navigate and transfer files between the local and remote systems. - For example, to download a file from the remote system to the local system:
get remote_file local_file - To upload a file from the local system to the remote system:
put local_file remote_file
ssh (Secure Shell):
sshis a command-line tool that allows secure access to remote systems over a network.- It provides a secure, encrypted connection, allowing users to log in to remote systems and execute commands remotely.
- To connect to a remote system via SSH, use the following syntax:
ssh remote_user@remote_hostFor example:ssh user@remotehost - Once connected, you can execute commands on the remote system's command-line interface as if you were physically present on the system.
- SSH also supports key-based authentication, allowing users to log in without entering a password, making it more secure and convenient for automated processes.
By using scp, sftp, and ssh, you can securely transfer files between local and remote systems, access remote systems for management or command execution, and automate file transfer processes. These tools are essential for system administrators, developers, and anyone working with remote systems in a Linux environment.
System Information and Monitoring:
- Retrieve system information with commands like
uname,hostname, anddf. - Monitor system resources with commands like
top,free, andhtop.
System information and monitoring are vital aspects of managing and understanding the state of a Linux system. They involve retrieving various details about the system, such as its name, kernel version, disk usage, and monitoring system resources like CPU, memory, and processes. Here's a detailed explanation of the topics:
Retrieving System Information:
-
unameCommand: Theunamecommand displays system information, including the kernel name, network node hostname, kernel release version, and machine architecture. For example,uname -ashows all available system information. -
hostnameCommand: Thehostnamecommand displays the system's network hostname. It can also be used to set or change the hostname. For example,hostnamedisplays the current hostname. -
dfCommand: Thedf(disk free) command provides information about disk space usage on file systems. It displays details such as total disk space, used space, available space, and the file system mount points. For example,df -hshows disk usage in a human-readable format.
Monitoring System Resources:
-
topCommand: Thetopcommand provides real-time monitoring of system resources. It displays a dynamic, interactive table showing information about CPU usage, memory usage, running processes, and other system metrics. It continuously updates the information, allowing you to monitor resource usage. Pressing 'q' exits thetopcommand. -
freeCommand: Thefreecommand shows the system's memory usage and availability. It displays information about total memory, used memory, free memory, and memory buffers/cache. For a more readable output, use the-hoption (e.g.,free -h). -
htopCommand:htopis an interactive process viewer and system monitor. It provides an overview of system resources, CPU and memory usage, and a list of running processes. It offers a more user-friendly and customizable interface compared totop. Pressing 'q' exitshtop. -
Resource-specific Commands: There are various other commands to monitor specific system resources:
vmstatcommand shows virtual memory statistics, including CPU usage, memory usage, disk I/O, and more.iostatcommand displays CPU utilization and input/output statistics for devices and partitions.netstatcommand provides network statistics, including active network connections, listening ports, and routing tables.
Monitoring system resources helps identify performance bottlenecks, detect resource-intensive processes, and optimize system usage. Regular monitoring ensures system stability, efficient resource allocation, and timely identification of issues.
By utilizing commands like uname, hostname, df, top, free, and htop, you can retrieve system information and monitor system resources effectively. These commands assist in troubleshooting, system optimization, and understanding the overall health of the Linux system.
File System Operations:
- Perform disk-related operations with commands like
df,du, andmount. - Format and partition disks with commands like
fdiskandmkfs.
Networking:
- Diagnose network-related issues with commands like
ping,traceroute, andifconfig. - Configure network interfaces using commands like
ifconfigorip.
Text editing with command-line editors like Vim or Nano.
Text editing with command-line editors like Vim or Nano is a fundamental skill for working with Linux systems. Command-line editors provide a powerful and efficient way to create, modify, and manipulate text files directly from the command line. Here's a detailed explanation of the two commonly used command-line editors: Vim and Nano:
Vim:
- Vim (Vi Improved) is a highly configurable and feature-rich command-line text editor. It is an enhanced version of the traditional Vi editor that comes pre-installed on most Linux distributions.
- Vim offers a modal editing interface, where you switch between different modes (e.g., command mode, insert mode, visual mode) to perform various editing operations.
- To open a file in Vim, use the following syntax:
vim file_name - Key Concepts:
- Command Mode: The default mode in Vim, where you can execute editor commands. Press
Escto enter command mode from other modes. - Insert Mode: Allows you to insert and edit text. Press
iin command mode to enter insert mode. - Visual Mode: Enables selecting and manipulating text visually. Press
vin command mode to enter visual mode.
- Command Mode: The default mode in Vim, where you can execute editor commands. Press
- Basic Vim Commands:
- Saving and Exiting: To save changes and exit Vim, press
Escto enter command mode and then type:wq(write and quit) or:x(save and quit). - Navigation: Use the arrow keys or
h,j,k,lto move left, down, up, or right, respectively. - Editing: In insert mode, you can directly type and edit text. Press
Escto return to command mode. - Copy, Cut, and Paste: In visual mode, select the desired text and then press
yto copy,dto cut, orpto paste.
- Saving and Exiting: To save changes and exit Vim, press
Nano:
- Nano is a simple and user-friendly command-line text editor. It aims to be easy to use, especially for beginners, with a more straightforward interface compared to Vim.
- To open a file in Nano, use the following syntax:
nano file_name - Key Concepts:
- Nano uses a simplified interface with a list of available commands displayed at the bottom of the screen.
- The most commonly used commands are shown directly on the screen for easy reference.
- Basic Nano Commands:
- Saving and Exiting: Press
Ctrl+Oto save the file andCtrl+Xto exit Nano. - Navigation: Use the arrow keys to move through the text.
- Editing: Simply type and edit text in the editor window.
- Copy, Cut, and Paste: Nano supports basic copy (
Alt+6), cut (Ctrl+K), and paste (Ctrl+U) operations.
Both Vim and Nano have their strengths, and the choice between them often comes down to personal preference and familiarity. Vim offers extensive customization and advanced features suitable for experienced users, while Nano provides a simpler and more accessible interface for beginners.
Mastering a command-line editor is essential for efficiently editing text files, creating scripts, and modifying configurations directly from the command line. Practice and familiarity with either Vim or Nano can significantly enhance productivity when working with Linux systems.
Covering these topics and common commands will provide a solid foundation for using the command-line interface in Linux. Additionally, practice and hands-on experience are essential for becoming proficient in working with the CLI.
Understanding the Linux-based systems, enables in firming up fundamentals in working with Docker, Kubernetes, and other Linux-based technologies.